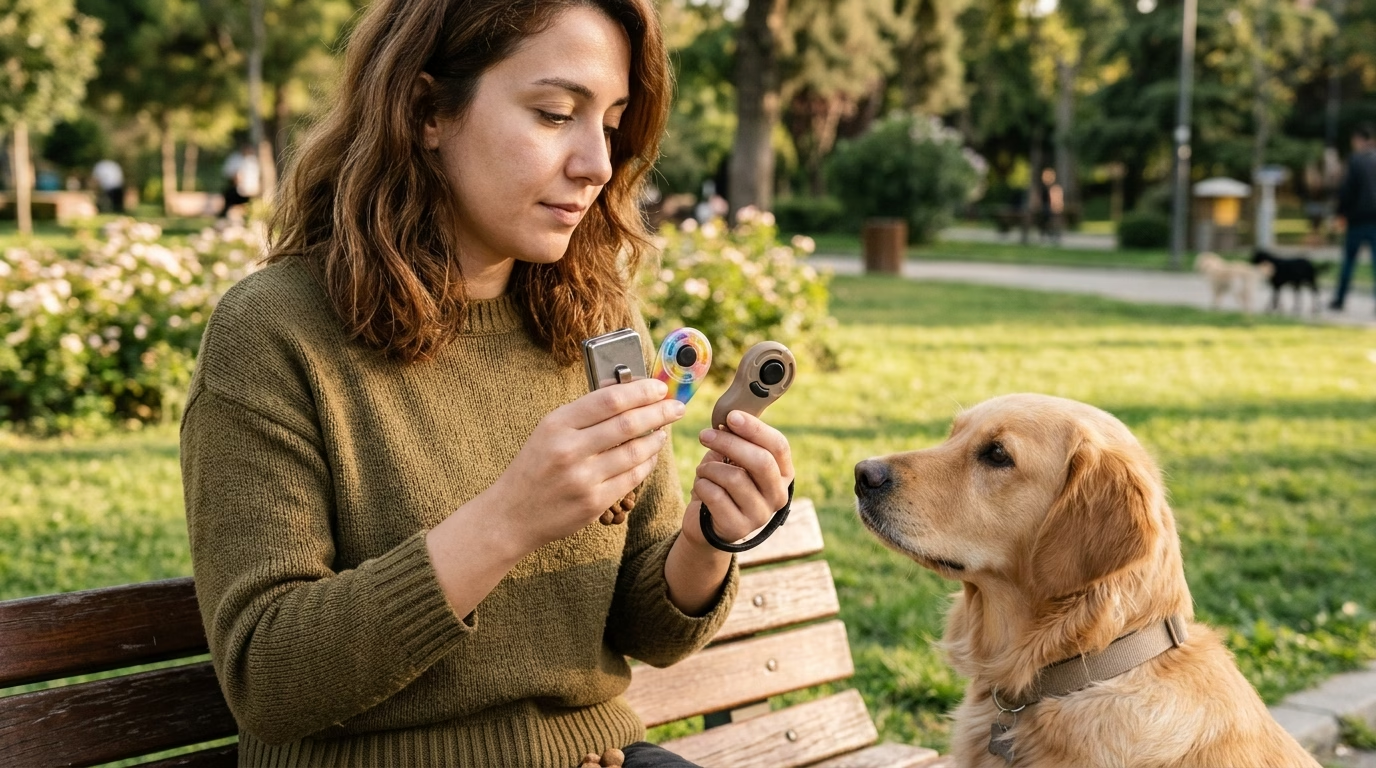
Choose a dog clicker you can press accurately with one hand, with a sound your dog notices without finding it frightening. Compare the button or pressing surface, grip and attachment before deciding by color, accessories or pack size. A device that is awkward to reach can make good timing harder, even if it looks convenient online.
A raised-button clicker is a practical starting point to compare for home training. A classic box clicker may suit a handler who prefers its pressing surface and sharper sound. Neither is automatically best for every dog: your handling and your dog’s response matter more than the category name.
What does a dog training clicker do?
A clicker is a handheld device that makes a brief sound. In reward-based training, that sound marks a particular action and tells your dog a reward is coming. It is not a command, a recall signal or a way to interrupt barking.
For example, you can click as your dog’s nose touches your hand, then deliver a treat. The marker identifies the contact even though handing over the food takes a moment. Dogs Trust’s introduction to markers explains how dogs first learn this connection through repeated marker-then-reward pairings.
Compare dog clicker designs
Start with how the device is operated. Then compare how it stays within reach. A wrist strap is an attachment option, while a multipack is a purchasing option; neither tells you how the clicker itself works.
| Design | When it is worth considering | What to check |
|---|
| Raised-button clicker | You want an obvious pressing point you can find by touch | Button resistance, reach and whether it clicks accidentally in your normal grip |
| Classic box clicker | You prefer pressing a metal tongue or broad thumb area | Comfort, how you must orient it and the actual sound level |
| Finger-ring clicker | You want the device positioned on a finger | Ring fit, button access and interference with your leash or treat handling |
| Clicker combined with a target stick | You already plan to use target-stick exercises | Whether the combined tool is comfortable and useful for your intended training |
Sound varies by product. For a concrete example, Karen Pryor Clicker Training describes its i-Click as a quieter design and its Classic Box Clicker as a louder option for outdoor work or distance. Those are manufacturer descriptions of specific models, not proof that every button clicker is quiet or every box clicker is loud.
Five features to check before buying
1. Sound your dog is comfortable hearing
The loudest clicker is not necessarily the most useful. Consider where you will train: a quiet room, a class or an outdoor area with background noise.
Look for a description of the sound and a return policy if you cannot try the device first. A recording may help compare the character of the click, but playback volume is not a reliable measure of how loud it will sound in your room.
Introduce it away from your dog’s ears. If your dog flinches, freezes or tries to leave, stop using that sound and reassess. A softer marker word may be a better choice than another device.
2. A pressing action you can repeat accurately
You should be able to activate the clicker deliberately without shifting it around or looking down. Check how much finger movement and pressure it requires.
If you have limited hand strength or mobility, compare the size and position of the pressing surface rather than relying on “ergonomic” in the listing. The right shape is one you can use comfortably. Ask about a demonstration or return option when a product description does not answer your needs.
3. A grip that works with the rest of your equipment
Think through a real session. Which hand holds the leash? Where are the treats? Can you reach the clicker while watching your dog?
A compact device is helpful only if it remains easy to find and press. Rounded edges and a secure grip may matter more than minimum size. For outdoor use, also consider whether gloves change how well you can operate it.
4. An attachment that keeps it accessible
A wrist strap can help prevent dropping the clicker, but the device still needs to settle in a usable position. A finger ring can keep it close, provided it fits without restricting movement. A clip may be useful for storage even when it is not convenient for clicking.
Check the attachment length and connection point. Avoid a setup that tangles with the leash, repeatedly knocks against hardware or leaves the clicker out of reach. Do not attach your dog’s leash to a clicker strap.
5. Clear care and replacement information
Check the manufacturer’s cleaning instructions and any claims about water resistance. Do not assume a plastic body means the internal mechanism can be soaked.
After a drop or exposure to moisture, check for sticking, cracks and unreliable activation before the next session. A spare can be convenient, but a large pack does not compensate for a design you find difficult to use.
A quick handling check before your first session
Try the equipment without your dog present, so practice clicks do not become unrewarded training signals. Karen Pryor Clicker Training’s mechanics guide recommends practicing handling separately from working with the animal.
Use this short comparison when choosing between devices:
- Pick up the clicker as you would during training.
- Find and press the activation point without looking down.
- Check that your normal grip does not trigger it accidentally.
- Hold your usual equipment and see whether everything remains manageable.
- Practice clicking first, then reaching for a pretend reward.
If you keep fumbling, try a different grip or design. Buying extra features will not resolve a pressing surface you cannot comfortably reach.
Clicker or marker word: do you need both?
A short word such as “yes” can also mark a behavior. It needs no equipment and may be easier during walks or when your hands are occupied. A clicker offers a distinctive mechanical sound, but requires you to carry and operate it.
Choose the marker that lets you communicate accurately while your dog stays comfortable. There is no need to buy a clicker if a consistent word already works well for you. Dogs Trust also describes visual markers, such as a clear hand signal, which can be useful for deaf dogs.
How to introduce a clicker in a short first session
Prepare small rewards your dog enjoys and use a calm, familiar space. Treats are convenient for initial practice because you can deliver them promptly; choose food appropriate for your dog’s diet.
- Click once, then give a treat. Begin without asking for a new skill.
- Pause and repeat a few times. Let your dog eat before the next pairing.
- Watch for anticipation. When the click prompts your dog to expect a reward, begin marking a simple, familiar action.
- Click during that action. For a sit, mark when your dog’s rear reaches the floor, then reward promptly.
- Finish while the session is going well. Repeat later rather than continuing when your dog disengages.
This follows the introductory approach described by Battersea and Blue Cross. Do not repeatedly click to attract attention or press the device near your dog’s ears.
Keep the sequence clear: behavior, click, reward. If your dog moves to receive the food after the click, the marker has already identified the action you wanted. Aim to deliver the reward promptly rather than expecting your dog to hold the position indefinitely after the marker.
Common beginner mistakes
| Problem | What to change |
|---|
| You click after the action has finished | Make the exercise easier and practice spotting the exact moment you want to mark |
| You reach for food before clicking | Prepare your setup and practice separating the click from treat delivery |
| You click to make your dog look at you | Use an attention cue; reserve the click for an action that has happened |
| You click when no reward is available | Have rewards ready before starting |
| Your dog is worried by the sound | Stop and use a quieter, comfortable marker rather than repeating a frightening sound |
As a straightforward beginner rule, follow every click with a reward, including an accidental click. Battersea’s reward-based training guidance advises keeping that association reliable. When a behavior is established, you can reduce your reliance on the clicker; that is different from clicking and repeatedly withholding the expected reward.
Frequently asked questions
What if my dog is afraid of the clicker?
Stop the session. Battersea suggests muffling the sound inside a pocket for sound-sensitive dogs and using a marker word if the sound still worries them. You do not need to persist with a clicker. If fear continues or affects other daily activities, seek advice from a qualified reward-based trainer or veterinarian.
Can you use a clicker with a puppy?
A puppy can learn a marker-reward association. Keep the task easy and the session brief, and judge the sound by the puppy’s response. Being young does not mean a dog needs a louder or more elaborate device.
Do you have to use the clicker forever?
No. It is a tool for marking actions, particularly while teaching or refining them. As skills become familiar, you can use other suitable reinforcement and bring the clicker back when learning something new.
Is an expensive clicker necessary?
Choose by operation, sound and comfort rather than price alone. A higher price does not tell you whether the button fits your hand or the sound suits your dog. Check local availability, return terms and the total delivered cost when comparing sellers.
Can you use it to stop barking?
A clicker is a reward marker, not a tool for startling a dog into silence. Clicking while barking may mark the barking. If barking is the concern, identify its cause and build an appropriate training plan rather than choosing a louder device.
Before you order
Check that you can operate the clicker comfortably, that its attachment suits your setup and that you have a plan to introduce its sound gently. Compare exact model details rather than assuming a particular shape guarantees a certain volume. If a marker word is easier for you and comfortable for your dog, it is a practical alternative.